Have you noticed your teeth becoming more yellow or experienced bad breath that doesn’t improve even with regular brushing? If so, tartar buildup could be the reason. Unlike plaque, hardened tartar cannot be removed with a toothbrush alone and usually requires professional dental cleaning.
In this article, I’ll share my tartar removal before and after experience, including the symptoms I noticed, what happened during the cleaning session, the results I achieved, and the tips my dentist gave me to maintain healthy teeth and gums.
Symptoms of Tartar Buildup Before Treatment
My tartar removal before and after journey began when I started noticing symptoms that I initially ignored, thinking they were temporary or harmless. However, as the tartar continued to accumulate, the problem became more concerning.
The main symptoms I experienced included:
- Yellowing teeth despite brushing daily.
- Persistent bad breath even after cleaning my mouth, which was embarrassing. During my tartar removal before and after consultation, my dentist explained that this condition is known as halitosis and is caused by bacteria accumulating on tartar deposits.
- Mild gum bleeding, especially when flossing.
- A rough feeling on the surface of my teeth when I ran my tongue over them.
- Mild swelling and redness in specific areas of the gums.
The real problem began when these symptoms worsened. That’s when I decided to consult a dental professional, who explained that tartar is not just a cosmetic issue. It poses a real threat to oral health because bacteria accumulate on its surface and can affect the gums. If left untreated, it may eventually lead to periodontal disease.
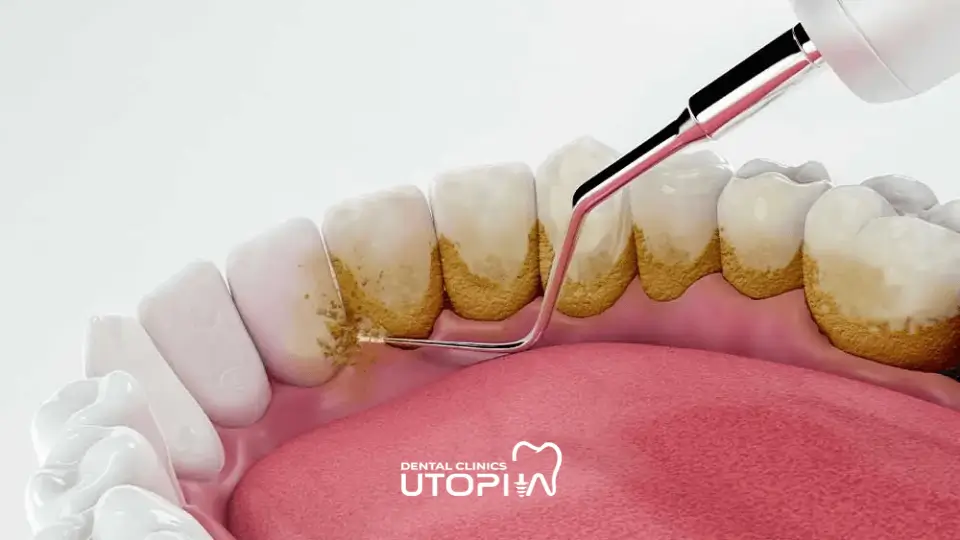
How Is a Tartar Removal Session Performed Step by Step?
I was very nervous before my first tartar removal before and after experience because I had heard stories about pain and discomfort. However, the reality was completely different.
The session went as follows:
- The dentist began with a thorough examination of my teeth and gums using a dental mirror and examination tools to determine the amount and location of tartar buildup.
- Next, an ultrasonic scaler was used. This device emits high-frequency vibrations that break apart hardened tartar deposits while a stream of water removes debris and cools the area. During this stage, I felt slight tingling and heard a buzzing sound, but it was not painful.
- The dentist then used specialized hand instruments to clean hard-to-reach areas between the teeth and below the gum line where the ultrasonic device could not reach effectively.
- At the end of the dental scaling and polishing session, my teeth were polished using a special paste that made them smoother and brighter while helping reduce future tartar accumulation.
My tartar removal before and after treatment required only one session because the tartar buildup was moderate. However, some people may need multiple appointments depending on the severity of the buildup. In general, a single session lasts around 40 minutes.
Also Read: What To Do After a Dental Cleaning
Is Tartar Removal Painful? My Personal Experience
One of the most common questions I received during my tartar removal before and after journey was whether the procedure hurts.
My honest answer is no, not usually.
I felt mild tingling when the scaler approached areas close to the gums and slight pressure in some sensitive spots. In severe cases of tartar buildup or for patients with extreme sensitivity, dentists may use local anesthesia. If you’re nervous, discuss your concerns with your dentist beforehand.
During my appointment, the dentist frequently checked to ensure I was comfortable and not experiencing pain.
After the session, I noticed some sensitivity to hot and cold drinks for about two days. This was completely normal and gradually disappeared without any additional treatment.
Overall, my tartar removal before and after experience was one of the most beneficial dental treatments I’ve had, helping me feel more comfortable and confident when speaking and smiling.

Tartar Removal Before and After
Once my treatment was completed, the difference was immediately noticeable, and other people noticed it too.
1. Immediately After the Session
The unpleasant bad breath disappeared completely. The yellow discoloration was significantly reduced, making my teeth appear naturally brighter.
I slept more comfortably because I no longer woke up with an unpleasant taste in my mouth.
2. After the First Week
Gum bleeding gradually stopped. My teeth felt noticeably smoother whenever I ran my tongue across them.
3. After Two Weeks
My gums appeared firmer and less red. My mouth stayed cleaner for longer periods after brushing and using toothpaste.
Beyond the cosmetic and health improvements, the biggest result was regaining my self-confidence. I felt comfortable smiling naturally without embarrassment.
Does Tartar Cleaning Weaken Teeth?
Absolutely not.
In fact, my tartar removal before and after treatment was delayed because I believed the common myth that tartar cleaning weakens teeth. I even tried several home remedies, such as olive oil treatments and other so-called “miracle” solutions for removing tartar, but none of them worked.
Before my appointment, I specifically asked my dentist whether tartar cleaning weakens teeth.
The answer was clear: tartar removal does not weaken or thin teeth.
On the contrary, tartar is the real enemy of dental health. As bacteria accumulate within tartar deposits, they produce acids that can damage tooth enamel and weaken the supporting bone around the teeth.
The dentist also explained that the temporary sensitivity some people experience after tartar removal is completely normal. Teeth that were previously covered by tartar become exposed again, so they may need a few days to adjust.
Read More: Does Dental Cleaning Damage Teeth?
Important Tips for Maintaining Your Teeth After Tartar Removal
My tartar removal before and after experience ended with several important recommendations from my dentist, which I continue to follow:
- Brush your teeth twice daily for at least two minutes each time.
- Use dental floss every day to clean between the teeth.
- Use an antibacterial mouthwash regularly.
- Drink plenty of water, especially after meals.
- Limit sugary, sticky foods and carbonated beverages.
- Visit your dentist every six months for preventive dental cleaning.
Conclusion
My tartar removal before and after experience was one of the best health decisions I have ever made. It is a simple, safe procedure that delivers noticeable and effective results while helping restore confidence and improve oral health.
If you are experiencing any of the symptoms mentioned above, don’t delay your dental visit. Your oral health is not a luxury; it is an essential part of your overall well-being. Don’t fear the dentist’s chair; fear neglecting your teeth.
Frequently Asked Questions
1. How long does a tartar removal session take?
Most appointments last between 30 and 60 minutes, depending on the amount of tartar buildup.
2. Can tartar be removed at home?
No. Home remedies such as olive oil, baking soda, or homemade tartar-removal solutions are generally ineffective. Excessive use of these methods may even damage tooth enamel over time.
3. How often should tartar be removed?
Most people with good oral health benefit from professional cleaning every six months. Individuals prone to tartar buildup or gum disease may require cleaning every three months.
4. Do teeth become whiter after tartar removal?
Yes. Most patients notice a visible improvement in brightness immediately after treatment because the yellow tartar deposits covering the teeth have been removed.
5. Is tartar cleaning safe during pregnancy?
Yes, but you should inform your dentist if you are pregnant. The second trimester is generally considered the most suitable time for dental cleaning. It’s also important to note that untreated tartar during pregnancy may increase the risk of gum inflammation due to hormonal changes.

